Yearly Archives: 2013

14 Composition Techniques that Will Instantly Improve Your Photos

Step 1 – Don’t try to be perfect

It’s important to understand that there’s no such thing as ‘perfect’ composition. As a subjective art form, you won’t ever reach a point at which you have achieved the perfect shot, but it is possible to have poorly and well composed photographs. There are many elements to the composition of a photograph, which I’ll detail as we go through, each acting as a simple guideline that will help you to take stronger and more engaging images.


Photo by Snow Peak
Photo by Snow Peak

Step 2 – Simplicity

One of the main things to consider is how the elements within the shot relate to each other and therefore what you include or leave out of the shot. There is often a temptation to fill a shot with any many points of interest as possible, but when composition is concerned, it’s better to be selective about what you include in the shot and execute with consideration. Some of the most dramatic photographs have very simple but effective composition, the eye is lead into the image and the viewer can engage with a clear and effective shot.


Photo by Ewan MacNeilage

Step 3 – Rule of thirds

One of the simplest rules of composition is the rule of thirds, which has become an extremely common tool for amateur and professional photographers. The method involves dividing the frame into thirds, vertically and horizontally (so it actually becomes ninths), and then using those lines to effectively bisect your image, using the lines to section off areas of the image and using the nodes at which the lines cross as key areas for points of interest. This rule, although very simple, works extremely well when used effectively, for example, within a landscape shot, the horizon could cross the frame along the lower horizontal line, with the top of a mountain range crossing the upper horizontal line. Similarly, with a portrait shot, the eyes could be placed at the points at which the upper horizontal line bisects the two vertical lines.


Photo by nandadevieast

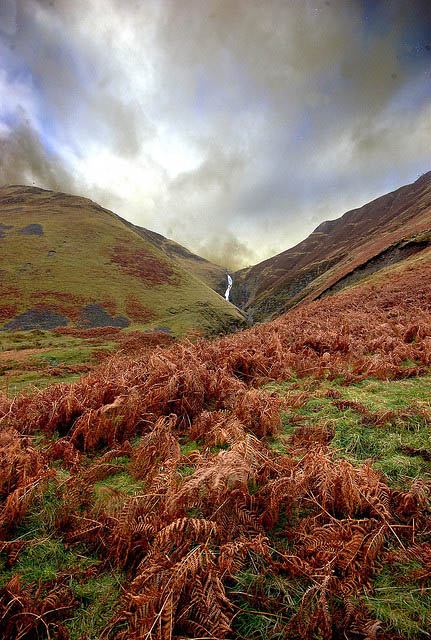
Step 4 – Landscape Composition

Using composition effectively when working with landscapes is essential. The drama of a great landscape shot is based upon it’s composition and structure. Ask yourself what you want your shot to be about. Is it about the water, the mountains in the distance, the horizon, the sunset or the rocks in the foreground? Which elements do you want to emphasise within your shot? Using the rule of thirds, try to make sure there are layers within the image, ensure you have some foreground interest to add a sense of depth and scale within the image and that the main focal point of the shot is given priority.
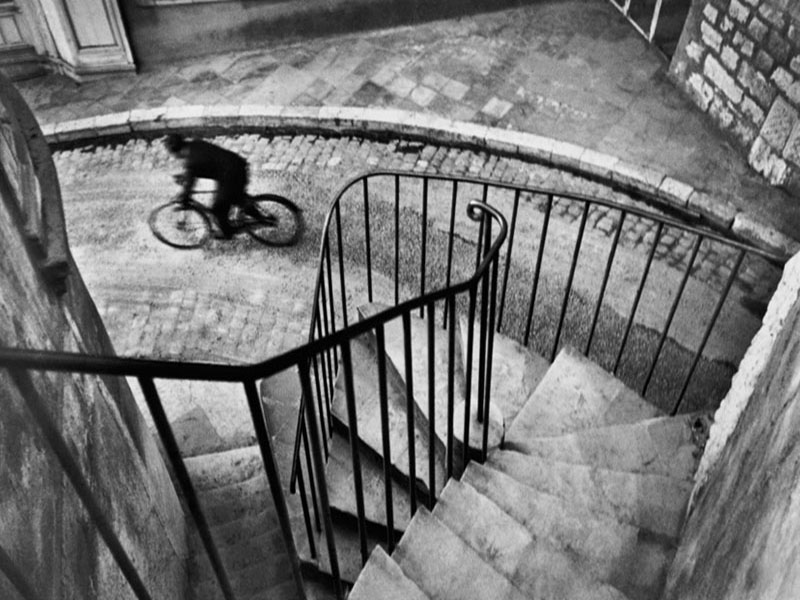

Photo by Simon Bray
Photo by Simon Bray

Step 5 – Lines

Lines within an image are one of the most effective ways to enhance the drama through your shot. Horizontal and vertical lines add particularly strong structure to images; where as curved lines give a more relaxed feel. Consider where each line within the images starts and leads to. It can often be very effective to have a line that leads the eye into the shot, for example, working it’s way from a bottom corner, through the image and off into the opposite back corner of the shot. Pathways, rivers, railway lines and roads will all lend themselves to this in the right situation.

When working with horizontal and vertical lines within your shots, which you undoubtedly will, please make sure that the shot is straight. You won’t believe how many shots I’ve seen that have been ruined by a slightly tilted line. Of course it is possible using post processing to correct these mistakes, but it’s far better to get into the good practice of ensuring that your shots are correctly aligned as you shoot.


Photo by Rob Ellis
Photo by Rob Ellis

Step 6 – Shapes

Once you’ve understood the role in which line has to play within the composition of your image, you’ll be able to begin to appreciate the influence of shape as well. Try to detach yourself from looking through your viewfinder at subject matter and consider the shapes of each of the elements in the frame. It’s important to understand how the shapes interact with one another. Strong shapes such as triangles and squares will be much easier to frame than softer circular shapes, but by appreciating how each element is formed, you’ll be able to powerfully portray the shapes and their correlation as subject matter.


Photo by Chris Hiramatsu

Step 7 – Contrast within the subject matter

When approaching your subject matter, consider it in context and how it relates to it’s surroundings. How do the colours, shapes, textures and tones of the main focal point compare to that of the surrounding area? If there is strong correlation, you may be able to work with that and highlight it within the image by using composition to merge the subject within it’s context. If the subject and surroundings vary greatly, then try using compositional techniques to enhance those differences.
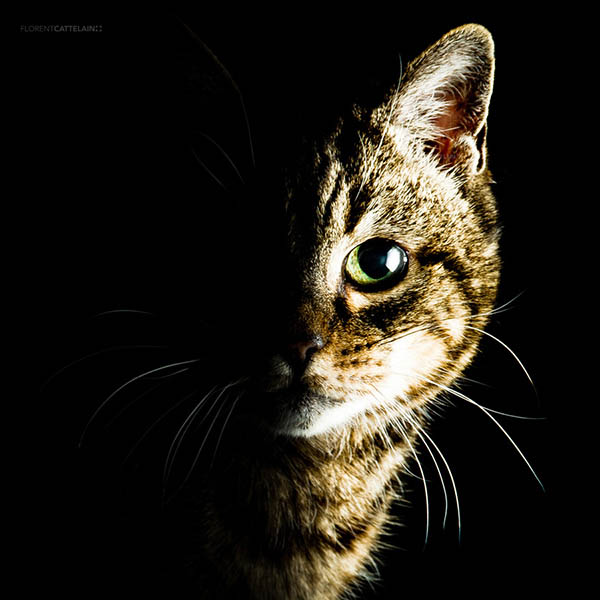
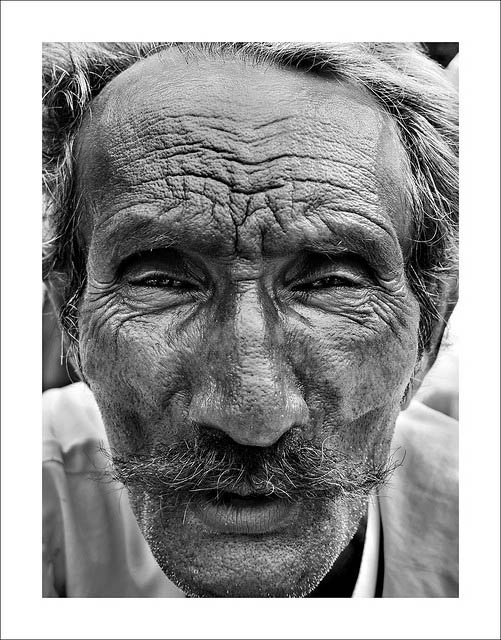

Photo by Simon Bray
Photo by Simon Bray

Step 8 – Framing

Framing a subject effectively is the basis of strong composition. The natural inclination is to put the main focal point dead centre of the frame but that can often look odd and out of context. Try offsetting the focal point either to one side or in a corner of the image to see if you can create some context for the image. Having said this, it is often the case that portraits are most dramatic when the subject is centered. so it’s up to you to experiment, but don’t just make one decision about the framing and stick with it, explore your options.


 Photo by Neil Singapore

Photo by Neil Singapore

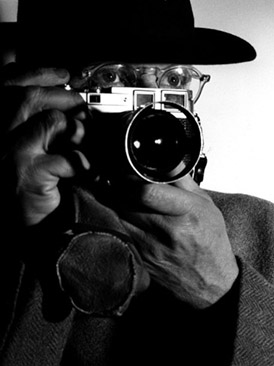
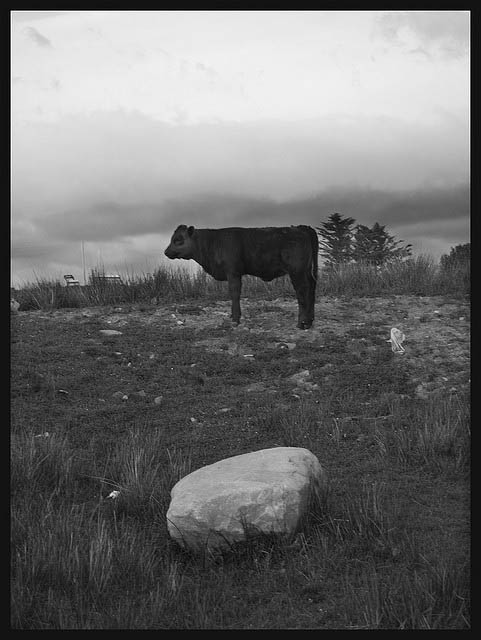
Step 9 – Negative space

It’s important to consider the negative space within an image. When working with smaller objects, the tendency is to try and fit the whole of the focal point into the shot. In actual fact, the composition of a macro subject is far more dramatic if you either fill the frame with the subject, getting right up close, or you employ some negative space around the image to let it breath and sit within the space around it. Try experimenting with something simple like a sea shell or a watch to see how you can vary the composition, rather than just shooting it, try getting up close or giving it some space.


 Photo by Armando Maynez

Photo by Armando Maynez

Step 10 – Angle

When working with your subject, consider the angle at which you are shooting from. It’s often easiest to photograph as subject from the angle at which we’d usually approach it, but as you spend time with the subject, explore a variety of angles and approaches. You may well find a more interesting way to express the subject.

Step 11 – Layering

Similarly to working with layers in landscape shots, don’t forget to include some element of depth within your images. Using foreground interest is the easiest way to do this, but even using staggered subject matter will add a sense of depth and lead the eye into the shot.


 Photo by Simon Bray

Photo by Simon Bray

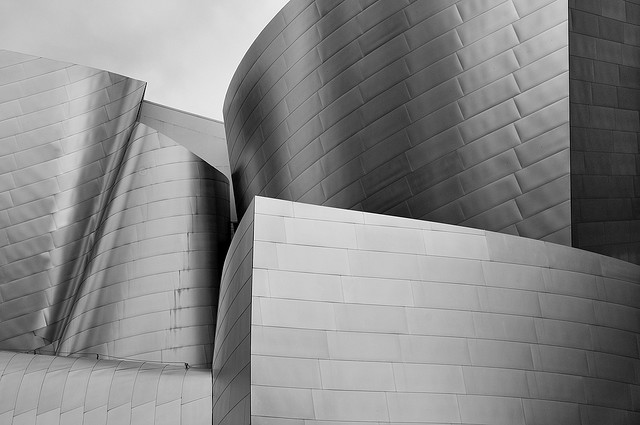
Step 12 – Symmetry & Pattern

The effective exploitation of symmetry and pattern can make for an extremely powerful shot, particularly when working with subjects such as architecture. Take time to observe the subject and recognise patterns (using the shapes and lines). Find the midpoint and be careful to set up the camera so it is square to the subject. Avoid external distractions that spoil the symmetry or pattern so you maximise the effect.


 Photo by Simon Bray

Photo by Simon Bray

Step 13 – Cropping

In this age of post-processing, all is not lost if you get home and you find that you’ve not composed one of your shots how you’d like. Pretty much all edit suites now have a crop facility in which you can shave sections off shots. You can either do this with a locked ratio (most photographs are 3:2), or you can freely crop the shot into any shape you like, for example, crop to a square shot, or create a panoramic landscape shot by cropping the upper and lower levels.

Step 14 – Practice Practice Practice

So there we have it, a set of compositional guidelines that should really help you on your way to stronger and more engaging images. As soon as you get the chance, head out and practice these suggestions. Whatever your shooting, landscapes, portraits, macro work, there is always space to try and enhance your composition to make the shot just that tiny bit more dramatic.

Please remember though, that these are not hard and fast rules to taking great shots. They may well help you, but they are also there to be broken. Once you think you’ve understood how to effectively put these into practice, feel free to start breaking them and capture your subjects in the creative way that suits you best.


Photo by Paul Stevenson

Jan Soudek – relentless ambition in photography

Jan Saudek is nowadays the most renowned Czech phoptographer in the world. He has had over 400 one-man shows held at. His photographs are included in the most important world collections.

Born in Prague in 1935, Saudek cultivated his dream to become a photographer since an adult. Self-taught, viscerally independent and hostage of the communist regime, he worked as a photographer for years in the cellar of his house (using the scraped off part of the room as his backdrop), vigorously achieving moral norms and social rules to follow his passion. And he mastered photography, which managed to free his delirium, his indignations: a mental grid, of the heart, of sex.

Through his black and white shots (which he began to colour by hand from ’77), a grotesque and intriguing eroticism of his nudes are coarsely shown both in its form and content. His images explore dreams more than reality, although strongly characterized by bloody subjects always expressed by the person drawn, and by the use of hand coloured images.
These images produce a non-realistic and honorific effect on oneself, even if Saudek’s choice was dictated by accidental difficulty of dangerous findings and coloured developments.

His photography has been a celebration of characteristics of human nature since the seventies: human beings, woman, father, mother, lovers and babies and adolescents. The passing of time, birth and death. In the eighties, a series of antithetical elements entered his imagination: love and hate, beauty and ugliness, youth and old age. They are all an animalistic aggression that as such stroked his masochism.

“Once there was a man who worked in a factory from six in the morning until three in the afternoon. He lived in a basement with the plaster crumbling off the mouldy walls, and all he could see through the window was a gloomy enclosed area. That man was Jan Saudek, and he owned little more than the bicycle he rode to the factory and an old Flexaret 6 x 6. His most valuable assets were certainly his immense energy and relentless ambition.”

(Christiane Frickeová, on JAN SAUDEK)

Photographic lighting

Outdor lighting

As a photographer, you work with light to produce quality pictures. The color, direction, quantity, and quality of the light you use determines how your subjects appear. In the studio, with artificial light sources, you can precisely control these four effects; however, most of the pictures you make are taken outdoors.

Daylight and sunlight are not a constant source, because they change hourly and with the weather, season, location, and latitude. This changing daylight can alter the apparent shapes, colors, tones, and forms of a scene.

The color of sunlight changes most rapidly at the extreme ends of the day. Strong color changes also occur during storms, haze, or mist and on blue wintery days. The direction of light changes as the sun moves across the sky. The shape and direction of shadows are altered, and the different directions of sunlight greatly affect the appearance of a scene.

The quality of sunlight depends on its strength and direction. Strong, direct sunlight is “hard” because it produces dark, well-defined shadows and brilliant highlights, with strong modeling of form. Sunlight is hardest on clear summer days at noon. Strong sunlight makes strong colors more brilliant, but weak colors pale. Sunlight is diffused by haze, mist, and pollution in the air.

This diffused or reflected light is softer; it produces weak, soft shadows and dull highlights. Directionless, diffused sunlight is often called “flat” lighting because it produces fine detail but subdues or flattens form. Weak, directionless sunlight provides vibrant, well-saturated colors.


front back light
front back light

Frontlighting

The old adage about keeping the sun at your back is a good place to continue our discussion of outdoor lighting. The type of lighting created when the sun is in back of the photographer is called frontlighting.

This over-the-shoulder lighting was probably the first photographic advice you ever received. This may seem to be a universal recipe for good photography. But it is not. The case against over-the-shoulder lighting is it produces a flattened effect, doing nothing to bring out detail or provide an impression of depth.

The human eye sees in three dimensions and can compensate for poor lighting. A photograph is only two-dimensional; therefore, to give an impression of form, depth, and texture to the subject, you should ideally have the light come from the side or at least at an angle.


side light
side light

Side Lighting

As you gain experience with various types of outdoor lighting, you discover that interesting effects can be achieved by changing the angle of the light falling on your subject. As you turn your subject, change the camera viewpoint, or wait for the sun to move, the light falls more on one side, and more shadows are cast on the opposite side of the subject. For pictures in which rendering texture is important, side lighting is ideal.

Side lighting is particularly important with black-and- white photography that relies on gray tones, rather than color, to record the subject. Shadows caused by side lighting reveal details that can create striking pictures from ordinary objects that are otherwise hardly worth photographing in black and white.

Anything that has a noticeable texture-like the ripples of sand on a beach, for example-gains impact when lit from the side. Landscapes, buildings, people, all look better when sidelighted.

This applies to color photography as well. Color gives the viewer extra information about the subject that may make up for a lack of texture in frontlighting, but often the result is much better when lit from the side.

Pictures made with side lighting usually have harsh shadows and are contrasty. To lighten the shadows and reduce the contrast, you may want to use some type of reflector to direct additional skylight into the shadow areas or use fill-in flash, whichever is more convenient.


backlight by Majuscule

Backlighting

When the sun is in front of the photographer, coming directly at the camera, you have what is referred to as backlighting; that is, the subject is backlit. This type of lighting can be very effective for pictures of people outdoors in bright sunlight. In bright sunlight, when subjects are front-lighted or even sidelighted, they may be uncomfortable and squint their eyes.

Backlighting helps to eliminate this problem. Backlighting may also require the use of a reflector or fill-in flash to brighten up the dark shadows and improve subject detail. Backlighting is also used to produce a silhouette effect.

When you use backlighting, avoid having the sun rays fall directly on the lens (except for special effects). A lens hood or some other means of shading the lens should be used to prevent lens flare.

Public domain book (NAVY Training course)

Use of Light in Photography

The use of light in a photograph can be the deciding factor of whether that picture will be spectacular or terrible.

When you use your camera to automatically chose aperture and shutter speed, what your camera is actually doing is using the built in light meter and measuring how much light is being reflected to the camera.

But that doesn’t mean that’s all there is to it. You should also think about the angle of the light entering the frame, what kind of shadows you want, and whether you want to use fill-in-flash (using flash to light the subject if you have a really bright background).

If you are shooting at night you can create all sorts of cool effects like lights in motion, pictures with moonlight, or silhouettes like the one shown here. The following are just some examples of all the possibilities.


© Dimitry Laudin[/caption]

The angle of light should be taken into careful consideration whenever you feel like you want to create a specific effect. Shadows can be very powerful when cast over half of someone’s face. In this photo on the left the light is striking the statue’s face from the rear right of the camera and this adds more depth to the picture. It also adds more coloring because if front-lighting was used his face would likely be over exposed, and if back-lighting was used his face would just be black like a silhouette.

The effect of rays of light indoors and outdoors. can be very spectacular. A brilliant part of some great photographs is the ability to see actual rays of light. Whether it be in the setting of a brilliant sunset, light pouring through a window or from artificial lights it can look very impressive. Usually the only way to obtain something like this is a narrow aperture (high f/stop) and a very slow shutter speed.

Silhouettes are another interesting example of using light. The way to create a silhouette is to have significantly brighter light coming from behind the subject. In doing this it is important to take your camera light reading off of the background instead of the subject in order for the camera to adjust for an exposure based on the backlight..

If you keep experimenting with different ways of using light you will find that you can get very interesting results.

by Richard Schneider

Bresson’s photo magic

Born: 22 August 1908
Died: 3 August 2004
Birthplace: Chanteloup, France

Best known as: French photojournalism pioneer who snapped the liberation of Paris

Frenchman Henri Cartier-Bresson is often called “the father of photojournalism” for his photos of famous events and people from the 1930s to the 1970s.

He studied painting and literature in the 1920s and was influenced by the visual aspects of Surrealism.

He took up photography in the early 1930s and had his first exhibitions and publications by 1933.
More about

Richard Avedon – portraits and fashion

Richard Avedon said of his photography: “A photographic portrait is a picture of someone who knows he’s being photographed and what he does with this knowledge is as much a part of the photograph as what he’s wearing or how he looks.”
Born in New York on 15 May 1923., Richard Avedon was in possession of a Kodak Box Brownie camera by the age of 12
Having studied philosophy at Columbia University in the late Thirties, Avedon went on to study photography under Alexey Brodovitch at the Design Laboratory of the New School of Social Research.
Richard Avedon shot the Paris collections for almost 40 years, and was staff photographer for Vogue from 1966. until 1990.
Richard Avedon became the first ever staff photographer for The New Yorker in 1992., at the age of 69.
From the start of his career, Richard Avedon’s name became synonymous with fashion as well as portraiture. He photographed everyone from Charlie Chaplin and Buster Keaton to Marilyn Monroe, Dorothy Parker and the Duchess of Windsor as well as a lot of “unknown” people. Known for bringing the fashion models of the day, including Suzy Parker and Sunny Harnett, to life, Richard Avedon injected a previously unseen vibrancy into the medium of fashion photography.
Richard Avedon married twice and has a son. Perhaps the most poignant set of photographs Avedon ever produced were those of his dying father. He died in 2004. of a brain haemorrage.

Steve McCurry magic eye

Steve McCurry (born February 24, 1950) is an American photojournalist.

Steve McCurry has been a one of the most iconic voices in contemporary photography for more than 30 years, with scores of magazine and book covers, over a dozen books, and countless exhibitions around the world to his name.

Born in a suburb of Philadelphia, Pennsylvania; McCurry studied film at Pennsylvania State University, before going on to work for a local newspaper. After several years of freelance work, McCurry made his first of what would become many trips to India.

Traveling with little more than a bag of clothes and another of film, he made his way across the subcontinent, exploring the country with his camera.

History of the first Polaroid color photography

History of the first Polaroid color photography

Edwin Herbert Land (1909-1991), ForMemRS, FRPS, Hon.MRI was an American scientist and inventor, best known as the co-founder of the Polaroid Corporation.

The Polaroid Land camera is an was produced between 1947 and 1983 and is a self-developing type camera. Polaroid Land Camera Model 95 was the first to be commercially available. It produced prints in about 1 minute. It was first available to the public in 1948.

Land’s new approach was to get the dyes in the film to move from the negative to the positive by way of a reagent by employing diffusion transfer to. A negative sheet inside the camera itself was exposed, then it was lined up with a positive sheet and squeezed through rollers which spread a reagent in between the two layers, creating what could be called a developing film sandwich of sorts. The negative developed quickly and after a minute, the back of the camera could be opened so the negative could be peeled away. What was left was the actual print (picture).

In 1963, the Polacolor pack film was introduced by Land, and this made it possible to take instant color pictures. The process involved was pulling two tabs from the camera, the second of which pulled the “film sandwich” through the rollers to create the picture. Since the camera was now dealing in color, the process was much more difficult, including a film negative which contains 3 layers of emulsion that are sensitive to blue, green, and red. 

Dye developing molecules lived under each layer in their complementary colours of yellow, magenta, and cyan. When an emulsion layer is struck by light, the complementary dye below it is blocked. For instance, when the blue sensitive emulsion layer is struck by blue, the yellow dye is blocked, but allows the magenta and cyan dyes to transfer to the positive, which then combine with each other to create blue. When green and red (yellow) strikes their respective layers, it blocks the complementary dyes of magenta and cyan below them, and only the yellow dye is allowed to strike the positive.

In 1972, Land introduced integral film, which didn’t require the photographer to peel apart the positive/negative to reveal the photograph. This process was like Polacolor film with a bit more timing and layers involved. The film itself integrates all the necessary layers and functionality into the film pack itself. The SX-70 camera was the first camera to use this type of film.

Polaroid camera
Polaroid camera

A brief timeline of Polaroid Photography

1926    Edwin H. Land leaves Harvard after his freshman year to pursue his own work on light polarization. Two years later, he creates the first synthetic sheet Polaris.
1932-1933 Edwin H. Land establishes Land-Wheelwright Laboratories in Boston with Harvard physics professor, George Wheelwright, III, and continues research and production of synthetic polarizers.
1935 American Optical Company signs a license agreement to use polarizers from Land-Wheelwright for the production
of sunglasses. The public announcement of the invention of polarizing disks is made at the Waldorf Astoria Hotel.
1937 The Polaroid Corporation is formed.
1938 Polaroid announces the Vectograph, a 3-D system using polarized spectacles. It is shown at the New York World’s Fair the next year and later used by the military.
1939 Polaroid products include glasses, ski goggles, stereoscopic motion picture viewers, a redesigned desk lamp, fog-free and dark-adapter goggles for the Army and Navy, and the company receives a contract to develop heat seeking missiles equipped with miniature computers. The company offices move from Boston to 730 Main Street in Cambridge.
1941-1944 Polaroid concentrates its efforts on products for the war.
1944 Land conceives of the one-step photographic system while on vacation in New Mexico with his family.
1947 On February 21, Land demonstrates the one-step process of producing finished photographs within one minute at the Optical Society of America meeting.
1948 The first Land camera, the Model 95, is sold in Boston at Jordan Marsh department store on November 26 for $89.75. This model is the prototype for all Polaroid Land cameras produced for the next 15 years.
1949 Photographic sales of the Land Model 95 camera exceed $5 million in the first year. Land hires Ansel Adams as a film consultant, initiating a long tradition of working with and supporting photographic artists. Several young photographers including Paul Caponigro, William Clift, Nick Dean, and John Benson will join the company in the 1950s and 1960s. PHOTOGRAPHIC RESOURCE CENTER at Boston university 832 Commonwealth Avenue, Boston, MA 02215 t 617-975-0600 f 617-975-0606 prcboston.org
1950-1954 Polaroid sales exceed $23 million and over 4,000 dealers in the US alone sell Polaroid cameras, films, and accessories. Polaroid leases additional office space in Cambridge and also opens a new manufacturing plant in Waltham.
1956-1958 The company spends most of its advertising budget on network television programs, while the one-millionth camera rolls off the assembly line. Polaroid products are now distributed in over 45 countries worldwide. The Waltham manufacturing site is expanded with the construction of an additional building.
1961 Polaroid Positive/Negative 4×5″ film Type 55 is introduced, the first black and white film that produces both a positive and a negative.
1963 Polaroid introduces Polacolor, as instant color film is invented. The Model 100 Land camera, the first fully automatic pack film camera to include automatic exposure control, and Type 48 and Type 38 Polacolor Land roll films are introduced.
1965 The inexpensive Swinger camera is released, a $20 camera that takes wallet-sized black and white photographs.
1967 The company leases 784 Memorial Drive in Cambridge for engineering and research, as an expansion program is announced with new facilities planned in New Bedford, Norwood, and Waltham.
1968 The Polaroid Collection is officially founded, as ongoing acquisitions of selected prints taken with Polaroid products is initiated with a group of Polaroid employees acting as the selection committee.
1971 The Polaroid Foundation is established as a charitable organization.
1972 Polaroid SX-70 Land Camera, the first automatic, motorized, folding, single-lens reflex camera which makes self-developing instant color prints, is introduced. Lawrence Olivier acts as an advertising spokesman for the camera, and Life Magazine features the camera and Land on its cover.
1973 The Clarence Kennedy Gallery is established in Cambridge to serve as a show case for the work of emerging and established photographers using Polaroid materials.
1976 The 20 x 24-inch and 40 x 80-inch instant cameras are developed to produce high quality art reproductions for museums. The cameras incorporate already existing Polaroid films including Polacolor ER film, Polapan black and white film, and Polacolor PRO film.
1977 Land is awarded his 500th patent. The OneStep Land camera is introduced and advertised in a series of successful television and print ads featuring Mariette Hartley and James Garner. This inexpensive fixed-focus camera becomes the best-selling camera in the US, instant or conventional. PHOTOGRAPHIC RESOURCE CENTER at Boston university 832 Commonwealth Avenue, Boston, MA 02215 t 617-975-0600 f 617-975-0606 prcboston.org
1978 Polavision, an instant color motion picture system, is introduced.
1979 Time Zero, a faster-developing film, replaces SX-70 film.
1980 Land retires as CEO, and becomes Consulting Director of Basic Research in Land Photography.
1981 Polaroid Sun 600 System cameras and Type 600 color film are released.
1983 Polaroid flourishes with 13,402 employees, $1.3 billion in sales, and more than 1,000 patents.
1986 Federal appeals Court upholds its decision that Eastman Kodak violated Polaroid patent rights in the manufacture of its instant cameras and film. The Spectra System camera is introduced at Jordan Marsh in Boston, 38 years after the first instant Land camera was announced.
1987 Polaroid Corporation celebrates its 50th Anniversary.
1991 Edwin Land dies at the age of 82.
1992 Captiva camera and film system, an ultra-compact format designed for instant portraits is introduced.
1998-1999 Digital camera sales make Polaroid the number one digital camera seller in the United States. Introduction of the I-zone, JoyCam, and PopShots cameras and films is successful.
2001 Polaroid Corporation files for Chapter 11 bankruptcy restructuring on October 12.
2002 On July 31, Polaroid Corporation is purchased by One Equity Partners, creating a new company that now operates under the Polaroid Corporation name, thereby launching a new era for Polaroid. Adapted from Innovation/Imagination: 50 Years of Polaroid Photography
(New York: Abrams, 1999), and Polaroid Access, Fifty Years (Access Press, 1989).

Henri Cartier-Bresson, inspiration for many phtographers

Henri Cartier-Bresson

Born: 22 August 1908
Died: 3 August 2004
Birthplace: Chanteloup, France

Best known as: French photojournalism pioneer who snapped the liberation of Paris

Frenchman Henri Cartier-Bresson is often called “the father of photojournalism” for his photos of famous events and people from the 1930s to the 1970s.

He studied painting and literature in the 1920s and was influenced by the visual aspects of Surrealism.

He took up photography in the early 1930s and had his first exhibitions and publications by 1933.


Visits to Mexico and the United States, and a job as an assistant to filmmaker Jean Renoir, helped develop his work, but it was World War II that launched his international career. Imprisoned by the Germans in 1940, he escaped in 1943 and worked with the Resistance, while polishing his skills as a portrait photographer and chronicler of everyday life.

He co-founded the photo agency Magnum Photos in 1947, and published his first book, Images a la sauvette, in 1952. His book, released under the English title of The Decisive Moment, became a foundation of modern photojournalism, and Cartier-Bresson became internationally famous as a camera artist whose specialty was capturing significant moments of human interaction.


Working exclusively in black and white, Cartier-Bresson captured the liberation of Paris in 1945, Gandhi just before his death in 1948, the Chinese revolution in 1949 and, over the years, dozens of portraits of artists, thinkers and politicians, including Albert Camus, Truman Capote, Che Guevara and Marilyn Monroe.

Henri Cartier-Bresson

In the mid-1970s he abandoned photography and returned to drawing and painting.

Extra credit: Henri Cartier-Bresson was the first photographer to have an exhibit in the Louvre.

Photo Camera “Sun & Cloud”

The new “Sun & Cloud” from Superheadz Japan is the world’s first “self-generation” digital camera capable of shooting both videos and
stills. With the success release of the Digital Harinezumi the new “Sun & Cloud” is Superheadz’ new take on digital retro photography in a
even more user friendly fashion.

Solar Camera Sun & Cloud

On top of the camera a solar panel is capable of self-generated electricity power charged automatically. In addition, the camera can also be
charged manually with a hand crank via kinetic energy, or through USB charging. So literally the camera can be used where you are! Don’t
be fooled by just its minimalist and distinctive look of a rectangle box, the Sun & Cloud is capable of creating all kinds of imageries and
movies.

On-board 15 built-in filters go from lo-fi all the way up to artist filters to let you shoot through its 3 mega pixel lens with 3 different shooting
modes of normal (150cm range), portrait (60 ~ 150cm range), and even macro (25 ~ 35cm range). High power LED light lets all you DH2+
++ and DH3 fans to now capable of shooting in the dark! The Sun & Cloud comes with a built-in mic so you can record sound in your videos
as well.