Monthly Archives: February 2014

5 Black and White Photography Tips

Post by Darren Rowse

1. Shoot in RAW

I know many readers of DPS can’t shoot in RAW (because their camera doesn’t offer it) or don’t shoot in RAW (because they either don’t know how or don’t like to) but for the most control in the post production phase of converting your color images into black and white ones – you’ll want to shoot in RAW if your camera does allow it. Of course shooting in JPEG doesn’t stop you shooting in black and white – but if it’s an option, give RAW a go, you might be surprised by what it offers you in post production.

© Nenad Nikolić, The Horseman

If your camera doesn’t allow you to shoot in RAW (or you choose not to) – shoot in color and do your conversion to black and white later on your computer.

2. Shoot in Color

While most digital cameras offer you the option to shoot in Black and White (and can produce some reasonable results) you have more control over your end results if you have the color data to work with in your conversion on your computer.
Update: There is an exception to shooting in Color and it’s when you’re taking note of point 1 above (shooting in RAW). When shooting in RAW and switching to Black and White mode you see your results in the LCD in black and white but the camera actually records all of the information (including color) – the best of both worlds. But if you’re shooting in JPEG – shoot in color and do the conversion later.

© Nenad Nikolić, Planet B612

3. Low ISO
Shoot with the lowest possible ISO possible. While this is something that most of us do in color photography it is particularly important when it comes to black and white where noise created by ISO can become even more obvious. If you’re after this ‘noise’ (or grain) you can always add it later in your post production – but it’s harder to go the other way and take noise out.
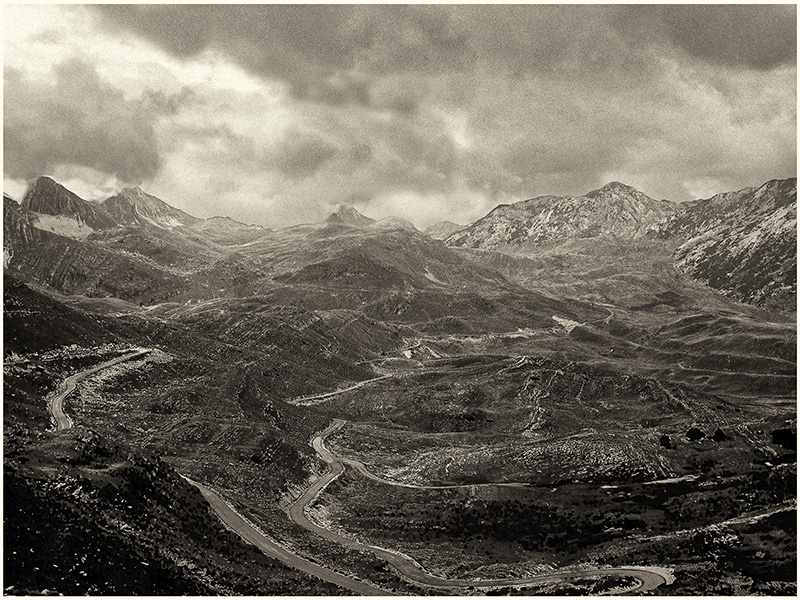
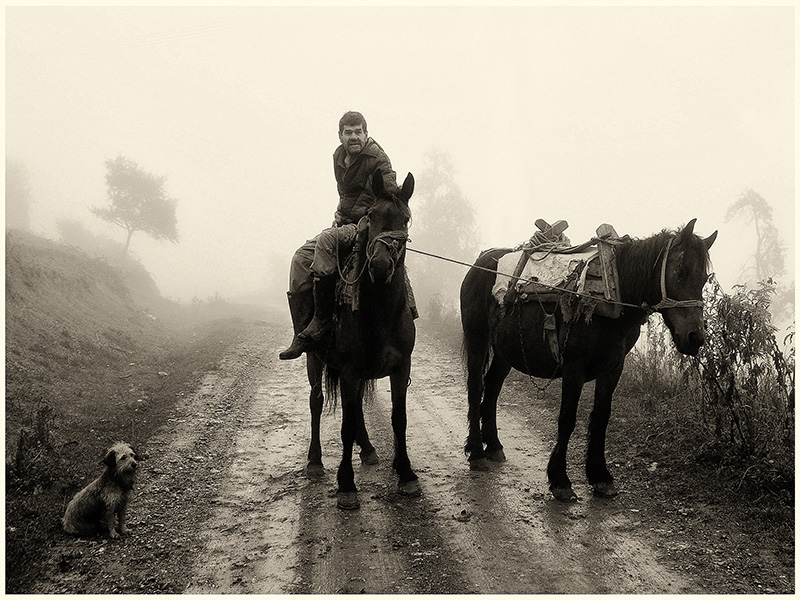
© Nenad Nikolić, Snake Road

4. When to Shoot

Many digital photographers actually prefer to shoot images for Black and White in low contrast situations. So an dark or overcast day can be a great time to shoot out door shots.
Ironically these are the days that those who shoot only in color sit at home complaining about the ‘poor light’. So next time you find yourself with a dark and gloomy day – shoot some black and white shots.
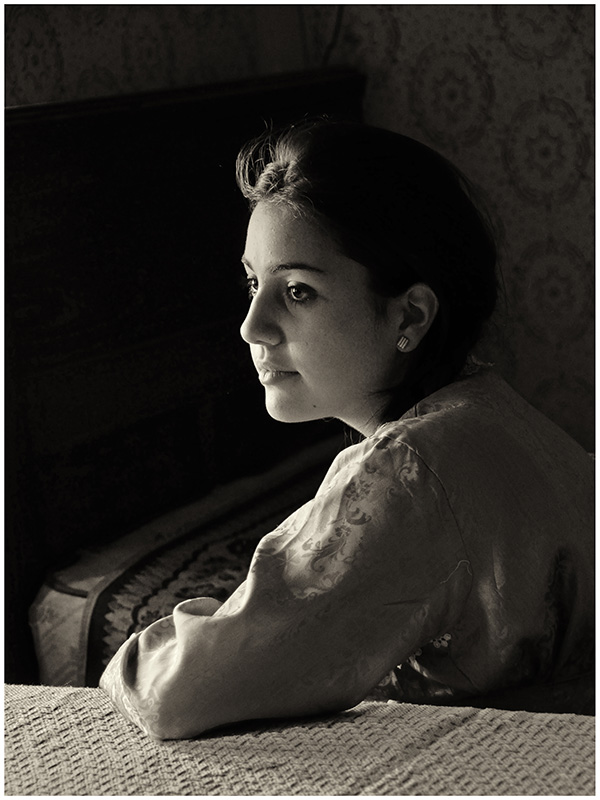
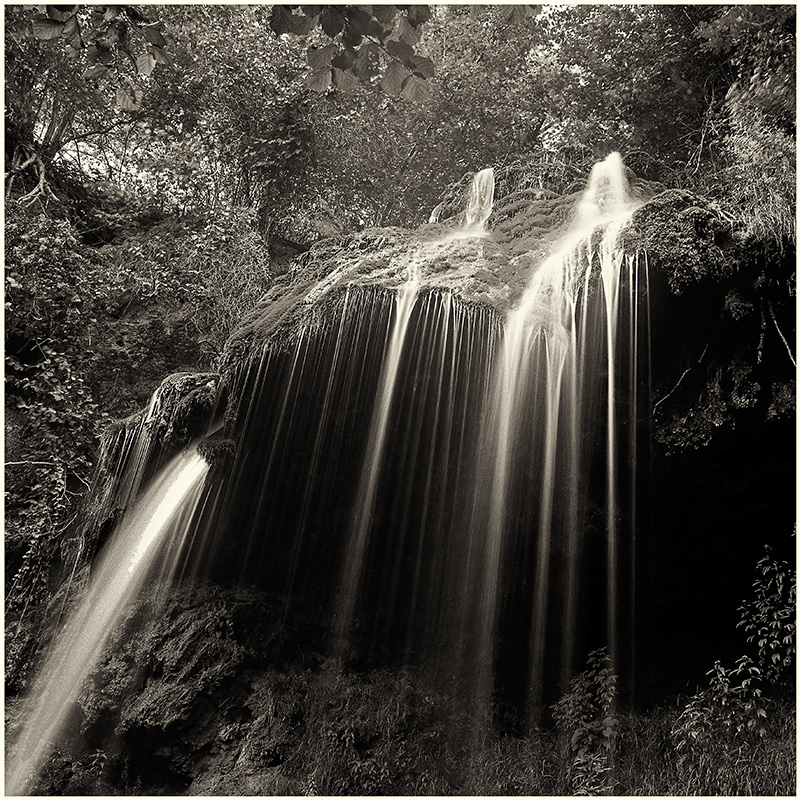
© Nenad Nikolić, Reverie

5. Composition
Most of the general tips on how to compose or frame a good shot apply just as well to black and white photography as they do when shooting in color – however the main obvious difference is that you’re unable to use color to lead the eye into or around your shot. This means you need to train yourself to look at shapes, tones and textures in your frame as points of interest. Pay particularly attention to shadows and highlights which will become a feature of your shot.

5 Composition Tips For Better Nature Photography

By Ian Plant on November 6, 2013

5 Composition Tips For Better Nature Photography
A snapshot shows the world what your camera sees, but a thoughtfully composed photograph shows the world what you see. While composition can be complex, several basic strategies arise when making pictures of natural subjects. Here are five such techniques for powerful image-making.

1. Lead the eye in.


Sea stack, Samuel H. Boardman State Park, OR: A 1/2 sec exposure blurs the wave. Shot with a Canon EOS 5D Mark III and 16–35mm f/2.8L II Canon EF lens at f/16, ISO 50, on a tripod.

One of the most effective ways to create a powerful composition is to use visual elements to lead the viewer’s eye into the scene. Leading elements can be just about anything—lines, curves, or a progression of shapes. Leading lines that stretch from foreground to background are especially powerful, propelling the viewer into the scene. In the image at left, I used an outgoing wave to act as a leading line. Other shapes placed in the foreground can do the same: a curving river can compel the eye to meander throughout the frame, whereas a triangle-shaped rock can point into the composition. Multiple elements can more subtly encourage the viewer to explore the photograph—a near-to-far, bottom-to-top visual progression is often particularly effective.

2. Find a good foreground.


Los Cuernos, Torres del Paine National Park, Patagonia, Chile: A 24–70mm f/2.8 Di VC Tamron SP lens was used with a polarizing filter to intensify the colors, and a 3-stop ND filter for a cloud-blurring exposure: 30 seconds at f/11, ISO 100.

Foregrounds add depth, and the best add punch, too. Providing a point of reference, they can simplify chaotic scenes. At this placid pool of water during a fiery sunrise, I backed up to incorporate the curving shoreline. Its shape frames the reflection of the mountains, enhancing the composition and adding depth to the image.

3. Engage the eye with repeating patterns.


Tarn 2, Acadia National Park, ME: A polarizer over a 100–400mm f/4.5–5.6L Canon EF IS lens helped intensify the reflection of autumn colors. EOS 5D Mark III, 1.3 sec at f/32, ISO 100.

People are naturally attracted to patterns, part of our ability and biological need to organize our chaotic world. When the eye explores one, it tends to want to visit each and every repeated element; accordingly, the savvy photographer can use repeating shapes and colors to encourage the viewer to visit multiple parts of the composition. Visual repetition gets the viewer’s eye moving, engaging interest and creating compositional energy.
On the flip side, repetition can also help create harmony and balance, adding structure to a composition, as well as to create order in an otherwise chaotic scene.
You can also create effective images by making the pattern itself the entire focus of the composition, as I did with the quirky shapes and patches of color in the little pond seen here. The less dynamic shapes of the lily pads floating in the water fade to the background, providing general structure and order for an otherwise energetic, chaotic collection of visual elements.

4.Emphasize your subject.


Red howler monkey, Tambopata National Reserve, Peru: A 500mm f/4L Canon EF tele with 1.4x Canon EF Extender III was shot wide open for shallow depth of field. Plant’s exposure: 1/200 sec, ISO 800, on his tripod-mounted EOS 5D Mark III.

Use visual elements to direct your viewer’s attention to what’s important. Framing is one effective tool for simplifying and focusing interest. Examples include arcing tree branches, barn windows, and natural arches, but frames can also be made by arranging multiple visual elements around a subject. Sometimes it works best if there is an element of contrast between the frame and the subject—silhouetted trees around a sunlit mountain peak, for example.
Another way to draw attention to your primary subject is through the use of light: spotlighting, or a dose of brightness behind your subject, can focus the viewer. For this image, I selected a position that framed the monkey with a pattern of out-of-focus leaves lit by the setting sun. A hint of that light on the monkey also helps focus viewers’ attention.

5. Create visual energy.


Lago Pehoe, Torres del Paine National Park, Patagonia, Chile: A 60-second exposure at f/5 created an eerie motion blur in the clouds. Plant used an EOS 5D Mark III and 16–35mm f/2.8L II Canon EF lens on a tripod for the ISO 400 shot.

Look for ways to convey a sense of energy. Use lines or shapes that tilt or point in opposite directions; think of a line of trees whose branches reach at differing angles into a cloud-filled sky. But be careful: Too much energy going one way and not enough going the other can look unbalanced—a classic example is an animal running out of the edge of the frame rather than into it. Long exposures of moving elements can also convey a sense of energy; motion blur creates compositional lines and shapes, adding further interest. Here, the streaking clouds form staggered, diagonal lines, which add energy to the frame.

4 Steps to Remarkable Reflection Photography

By Simon Bray,27 Nov 2010

Photographing reflections can be extremely rewarding and produce stunning results, but sometimes achieving those dramatic shots can be harder than first thought. Today I’ll be highlighting a few quick tips for dealing with reflections, and helping you on your way to taking some breathtaking photographs!

Step 1. The Basics
Reflections come in many different forms and guises, varying from dramatic landscape shots to detailed macro compositions, but there are a few fundamental techniques which will help you achieve better results when dealing with reflections.
With regards to depth of field, try to select a high f-number such as f/11 or higher, this will help level out the subjects of the shot so the eye perceives them in closer relation, enhancing the reflection effect.
Focus depends a lot on the distance between the subject and the reflection. First, try focusing on the subject, then trying focusing on the reflection. This should produce slightly varied results and your preference will depend on how much attention you want to draw to the reflection.
Finally, think about the angle of the light and how it affect the reflection. In a studio setting you can manipulate this to emphasise the reflection, but in a natural setting you may want to explore different viewpoints to find the angle at which the reflection is most visible.

Step 2. Water & Landscapes
The grandeur, colors, and patterns offered by nature can be breathtaking and for me, the essence of this is displayed in a snowy-topped mountain reflecting upon a serene lake. The scene is a photographers dream, but how do you maximise its potential to capture a breathtaking shot?
Firstly, try and go when the light is at it’s best, either bright and early, or in the evening as the sun is setting. Be sure to take along your tripod to ensure a sharp shot and try using a couple of filters. A polarising filter will help you to control the amount of surface shine from the water, and a graduated neutral density filter will help ensure that the sky isn’t overexposed.
Try experimenting with slightly longer shutter speeds than normal to smooth out the water and, as I mentioned before, be sure to take into account the depth of field, angle of the light and try focusing in on the water for that extra level of drama.
3
Step 3. Shiny Things!
Photography involving reflections doesn’t have to be restricted to water-based landscape shots, there are plenty of other reflective surfaces to utilise that we encounter in everyday life such as mirrors, glass, metal, ceramic tiles and even varnished wood.
It’s important to remember that shiny surfaces such as these don’t absorb light, so if using artificial lighting, think carefully about the amount and angle of the light in relation to your surface. You may want to experiment with lighting from above or behind your subject.
This also applies to the use of flash, which will probably be limited as the light will often just bounce straight back at you.
Try to ensure that your surface is clear of scratches and fingerprints, especially when focusing in on detail within the reflection. Flat surfaces are easier to work with, as they will give more complete reflections.
Once you’ve found your surface, try using different subjects to see what reflections you can achieve. You can use anything you like, but the more interesting the shape, the more interesting the formation of the reflection will be.
4
Step 4. Experiment and Enjoy
Reflection photography is often described as abstract, which I think can be the case, but when utilising reflections, the type of shots that you create are totally up to you, the photographer.
You may want to utilise a reflective surface to make an otherwise predictable photo shoot more interesting, you may want to capture stunning real life landscapes, or you may want to experiment with angles and lighting to create eye catching abstract art shots. The joy is in the variety of potential shots, now it’s up to you to go and capture them!

Orbs – reflection of light or spiritual beings?

Orb artifacts are captured during low-light instances where the camera’s flash is used, such as at night or underwater—or where a bright light source is near the camera. The artifacts are especially common with compact or ultra-compact cameras, where the short distance between the lens and the built-in flash decreases the angle of light reflection to the lens, directly illuminating the aspect of the particles facing the lens and increasing the camera’s ability to capture the light reflected off normally sub-visible particles.
The orb artifact can result from retro-reflection of light off solid particles (e.g., dust, pollen), liquid particles (water droplets, especially rain) or other foreign material within the camera lens.
The image artifacts usually appear as either white or semi-transparent circles, though may also occur with whole or partial color spectrums, purple fringing or other chromatic aberration. With rain droplets, an image may capture light passing through the droplet creating a small rainbow effect.

Green orbs

In underwater conditions, particles such as sand or small sea life close to the lens, invisible to the diver, reflect light from the flash causing the orb artifact in the image. A strobe flash, which distances the flash from the lens, eliminates the artifacts. Below are two diagrams of a hypothetical underwater instance. In Diagram A, the faces of particles directly aligned with the camera’s lens are illuminated by the flash, and thus the camera will more likely record orbs. In Diagram B, the faces of particles illuminated by the flash do not face the lens and therefore remain un-recorded.

A hypothetical underwater instance with two conditions in which orbs are (A) likely or (B) unlikely, depending on whether the aspect of particles facing the lens are directly illuminated by the flash, as shown. Elements not shown to scale.
Orbs are one of the more common paranormal phenomenon you learn about when you study ghost hunting and parapsychology. An orb is an unusual ball of light, most often found in photographs or video. But what are they, and how can you tell an authentic orb from a trick of the light?

False Orbs
There is a reason the rise of orbs caught on film has gone through the roof digital technology and the fact that everyone has a camera on them at all times has made capturing them more common. A little too common, in fact.
The fact of the matter is, most orbs caught in photos these days are not supernatural. With a little experimentation, you can replicate orbs to your heart’s content. Turn on a fan or AC in a room and take a photo with a flash; you’ll probably get at least one or two orbs, if not dozens– depending on how much dust is in the air. Minuscule moisture droplets, insects and other such debris can also show up in photos of orbs.
While most orbs can be attributed to dust and moisture catching the light or flash reflection, this is not always the case. Some orbs have distinct characteristics that are not present in dust orbs.
The same thing can happen on video; when you see an orb seemingly fall straight down, or blow across like a draft, chances are its just debris.
Most skeptics will point to these and tell you its evidence that orbs are nothing but a trick of the light caught on film, but that’s not the whole story.

Spirit Orbs
While most orbs can be attributed to dust and moisture catching the light or flash reflection, this is not always the case. Some orbs have distinct characteristics that are not present in dust orbs.
For one thing, some orbs in photos seem to be behind a thing or person, as if peeking out or passing by in the background. This is a significant difference; reflections don’t fall behind an object in the photo; a true reflection of dust will always cause an orb-like light effect in front of any person or thing in the film, because the orb is essentially a minor flair back on the lens. When the orb is behind something or someone, it’s not a reflection.
A spirit orb has more of a density to it than a natural particle orb; instead of a translucent, perfect ball, it may be misshapen, have odd shapes in it, seems thicker, more three-dimensional and less translucent.
On film, moving orbs seem to have a light of their own rather than being a reflection. They also seem to move independently—not like something caught in a breeze or wind. They may move back and forth in a room, or come in one door and go through another. This is not something dust and particles would do. An insect might, but then unless it were a firefly it would not have a glow of its own.

Orbs with the Naked Eye
Not all orbs are caught on film. There are times when orbs have been observed by people or groups of people with the naked eye. By some reports, orbs even attempt to communicate with people; they’ve deliberately come close, flown around or otherwise tried to make themselves known (or at least, this is what people who have encountered them believe the orb to be doing).
One thing you should know about spirit orbs of light is that they’re not usually associated with threatening behavior. Could these be good spirits—or at least the spirits of normal people? Could they be angels or spirit guides trying to tell us something, or hovering around us keeping their eternal watch? One day perhaps we’ll know; for now, all we can do is keep our eye on the ball.

Reflection in photography

Reflections are a mainstay of photography, and with good reason – reflections are everywhere in the world around us, and can provide a variety of effects, from spectacular symmetrical sunsets to eerie window portraits.
Using reflections is one of the most popular—and powerful—techniques in photography, from beautiful sunsets to lonely silhouettes.

Water Planes

Probably the most common type of reflection photography out there, but that doesn’t mean that it’s all just cliché. Spectacular sky-scapes reflected on water are a mainstay—the symmetry provides for double the beauty, after.
Beyond that, many photographers choose to mix it up with silhouettes, common water features such as docks, but also human silhouettes or the natural curve of the shore.
Nor does the reflection have to be the focus of the picture. The focus of the picture could be something completely different, while the reflection itself merely provides a subtle, simple background. It’s a time-honored way to take a picture, and one that is difficult not to have exquisite results with.
Times near dawn and dusk are the most typical, and with good reason: not only is the water is more likely to be calm, but the colors and clouds of the sky also tend to be more dramatic. Take a walk in a park near you—maybe with a friend for some silhouettes or brainstorming, or maybe with just an eye for interesting features and lines.

In our modern world of glass and steel, man-made reflective surfaces abound.

While sunsets and storm clouds look fantastic on the face of a skyscraper, many of these surfaces are only half-reflective—which in itself can be used as a powerful tool. A pane of glass can be a window to both the inside and outside worlds, a medium for very surreal effects.
Experiment with the manmade surfaces around you. They don’t have to be perfectly reflective—dirty glass, while maybe not the prettiest for a passerby, can provide a gritty noir mood to a photograph. Partial reflections can be used to juxtapose multiple scenes on top of each other, so keep a keen eye out on your surroundings. A walk through any urban environment and a creative eye is bound to be fruitful.

no images were found

no images were found

Â